Friday 29 March 2013

User Upper Of Wooly Bits - Crochet Scarf Tutorial


This little project was originally inspired by A SCARF OF MANY SCRAPS, over on Tales of Ted and Agnes blog.  I read this blog post nodding my head and thinking, yurp I do have far too many odds and ends of wool laying around.  In fact I have a whole drawer full of bits and pieces that could do with using up.  What doesn't help is the fact that the first crochet project I ever undertook was a small afghan which used lots of different colours in small amounts.

(in hindsight this would have been a good project to use some of these little bits up... but you can't tell that to a woman on a crochet mission!)
 
With each each project I finish since then, I seem to just be adding more and more to my odds and ends drawer!
 
I've tried to add my own spin on this project.   I wanted to learn a new crochet stitch, so have made it almost lace looking.  Being a bit of a colour freak, I couldn't resist making this in brights.  My two coats that I've made this to go with are purple and electric blue, so, well, that says it all really!  Also part way through crocheting this scarf I decided to incorporate some embroidery into this project too... I mean, why not? I do have a habit of over complicating things I make.  Sometimes it can be a bit of a ball ache, but usually I'm happy with the results!
 
 
The stitch I've used is Basic Filet Crochet.  It looks complicated and fiddly, but if you look really closely it is made up of lots of chain stitches and double crochet, which are just placed in a repeating pattern.  So in reality it is actually really simple!
 
The pattern is worked in multiples of 12, plus 1.  I have done the scarf 4 x this in width, as I don't like a scarf that is too thin.  Seemingly a little pointless when you have the cold wind whipping around your neck!
 
 
The pattern goes as follows:
 
1. Ch12, plus 1, turn work.
 
2. Ch3 (to count as first dc), dc in 4th ch from hook, *3 dc, ch 2 (skip 2 stitches), dc in next ch, ch 2 (skip 2 stitches), dc in next ch, ch 2 (skip 2 stitches), dc. Repeat from * til end of row, turn work.
 
3. Ch 5 (skip 2 ch space), dc into top of dc, 2 dc into ch space, dc into top of dc, *ch 2 (skip ch space), dc into the top of dc, ch 2 (skip 2 dc), dc into top of dc, ch 2 (skip ch space), dc into top of dc, 2 dc into chain space, dc into top of dc, repeat from * to last 2 squares, ch 2 (skip ch space), dc into top of dc, ch 2 (skip 2 dc), dc into top of dc, turn work.
 
4. Ch 3, dc into top of dc, *2 dc into ch space, dc into top of dc, ch 2 (skip ch space), dc into top of dc, ch 2 (skip 2 dc), dc into top of dc, ch 2, (skip ch space), dc into top of dc, repeat from *, ending with a dc in 3rd ch of ch space at end of row, turn work.
 
5. Continue steps 3, 4, 3, 4...
 
6. When I got towards the end of the scarf, I decided I wanted to add embroidery detail.  To do this I simply filled in the little "windows" (ch spaces) in three places, to leave space for three patches to be sewn on.  This is mainly so that the scarf appears neat on the reverse side and also to keep the embroidery laying fairly flat.
 

The scarf I made is 188 rows in length.  Long enough to double over and fold back through itself.  The block patches I have added are on rows 165, 168 and 178.  You could also make this scarf narrower and shorter for a much quicker project.
 
 
As we are coming to the end of winter, (hey its nearly summer and still snowing here!) I wanted to give the scarf a little longevity of wearing, so gave it a spring time vibe.  I've added embroidery of two blue birds with a heart, a sunshine peaking through clouds and the words "one fine day." I created the patches using two layers of cotton fabric.  The designs were drawn on in water soluble pen and embroidered using only satin stitch and basic back stitch.  I then ladder stitched the patches into place, tidied up all my loose ends, washed away the water soluble pen and voila!
 
 
I wore her into town today and she was lovely and warm!


Thursday 21 March 2013

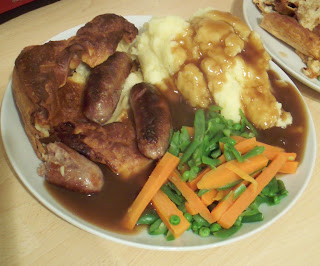
Tasty Toad In The Hole

On Sunday we popped to the local farmers market.  I picked up a couple of locally handmade candles, in sweetpea and floral freesia fragrances, yum!  I also bought a customary sausage roll for my daughter.  Funnily enough the longest word she can currently say at 22 months is "would-you-like-a-sausage-roll-yes-please-mum!"  She is definitely my daughter!  While I was there I bought some plain pork, free range, rare breed sausages.  Seeing as I was cooking them for tea tonight, I figured I would share my recipe as batter can be a tricky one and I always, ALWAYS make my own Yorkshires from scratch.

This is a no frills teatime recipe.  I have used mainly value ingredients as I think it makes no difference to the taste (isn't everything expensive enough these days?!) and splashed out on some really good quality sausages.


Ingredients:

100g plain flour
Pinch salt
2 small/med eggs
100ml milk
3tbsp sunflower oil
6 good quality sausages
1 medium onion
A splash of vinegar
Approx 50ml water

*If you notice in the photo I used vegetable oil, but do prefer to use sunflower oil.  I just made do with what I had.  Please don't make this with olive oil!!!! You need an oil that you can take to a high temperature before it catches.  If you use olive oil, you will set off all the smoke alarms!


Method:

1.  Preheat the oven to 240oc/gas mark full whack!

2.  Sift the flour and salt into a bowl.  Make a well in the centre and whisk in the eggs and then gradually mix in the milk and water, whisking all the time to prevent the mixture going lumpy.  Your mixture should make a clip-clop-plip-plop noise when stirred and dropped (this is how my mother taught me.)  If it feels a little thick add a touch more water to the mixture.

3.  Add a few drops of vinegar to the mixture.  Don't worry about over whisking at this point.

4.  Chop the onion into 6 wedges and put into a medium sized oven proof dish.

5.  Put 2tbsp of oil into dish.  Heat in the oven for 15 minutes.  (Its really important you heat it for 15 minutes. 10 minutes is not enough, you need it to really be sizzling (starting to smoke) and start cooking instantly when the batter hits the oil.  My oil wasn't quite hot enough when I added the batter and it really shows.  Although it was very yummy, I've had much more successful huge impressive batters than this one.  I guess that is the nature of the beast ;o)

6.  Put the remaining oil in a frying pan and quickly brown the sausages.  While the sausages are colouring, whisk the batter like the clappers, then whisk a little more!

7.  Carefully take the dish out of the oven, quickly add the sausages and batter and return to the oven.  Cook in the middle of the oven for 10 minutes, before turning the heat down to 220oc and cooking for a further 20-30 minutes. Do not be tempted to open the oven during cooking time as this will result in a poor rise.

 
I can tell you it tasted fantastic and the posh sausages really made the difference.  Yum yum, I'm stuffed!

Thursday 14 March 2013

Carroty Cake Goodness

Please excuse me if I fill the keyboard with crumbs while I write this...


I have spent the morning baking with my little girl and just had to share my recipe with you.  A nice simple one to make.  Simple as it is, this is the most deliciously moist carrot cake I have ever eaten.  I have not iced the one I've made as I don't have a particularly sweet tooth, and sometimes really sugary things make my teeth squeak!  But I have included a vanilla cream cheese frosting recipe for special occasions or for if you're just feeling a little naughty!

 
This cake is very moist and should keep well in an air tight container.  Usually cakes don't last long in my house.  If you live alone, still like to bake and hate seeing a cake sitting going to waste, I would suggest splitting the mixture and filling two loaf tins.  One of the loaf cakes can then go in a sealed bag or box in the freezer til you've finished the first.  You can also pre-slice the cake and freeze it flat or with pieces of baking paper in between, so you can defrost lunchbox portions of cake as you want them.

 
Ingredients:

175ml sunflower/ veg oil
100g light muscovado sugar
75g caster sugar
3 eggs
175g grated carrots
125g sultanas
175g self raising flour
1tsp bicarbonate of soda
1tsp cinnamon
1/2tsp mixed spice


Method:
 
1.  Preheat oven to 180oc/ gas mark 4.
 
2.  Grease and line a 23cm/9" square tin.
 
3.  Gradually add eggs and oil to sugars until combined.  I mixed mine in with a whisk here, as I forgot to bring my eggs to room temperature and my muscovado sugar had gone all clumpy (not sure if that is the technical term.)
 
4.  Stir in grated carrots and sultanas.
 
5.  Sift in flour, bicarbonate of soda and spices, and fold through evenly using a spatula.
 
6.  Scrape mixture into prepared cake tin and bake for 40-45 mins.
 
7.  Cake is baked when well risen and springs back when touched.
 
8.  Leave to cool if frosting and get the butter and cream cheese out of the fridge, to bring to room temperature. (see below)  
 
 
Frosting:
 
60g butter (at room temp)
125g cream cheese (at room temp)
125g icing sugar
1/2tsp vanilla extract
 
1.  Beat together butter, cheese and vanilla.  Don't be tempted to add more vanilla extract to the frosting as it will only go too runny! 
 
2.  Gradually add icing sugar (so it doesn't all go up in the air) and mix until thoroughly combined.
 
3.  Spread frosting over cake roughly, using a flat knife.
 
 
Get creative:
 
If you want to try making the cake a little different you could add the zest of an orange to the cake mixture at step 4. and swap the vanilla extract for a little orange juice in the frosting.


Sunday 10 March 2013

Doily designs

I've been struck with inspiration over the weekend.  Although not much actual sewing has gone on, I've been working on lots of ideas, laying out fabrics, deciding on colours, playing around with composition, etc.  Quite often the actual design process can be more difficult than the sewing and putting together of pieces!
 
I have been gathering quite a nice little collection of doilies of late.  Although I fear someone else is now buying up all the lace pieces, as there were none in my favourite charity shop on Friday.  Not even any of the odd ones I had discarded the previous week, thinking I shouldn't really buy so many in one go, oh dear!  Oh well, I'm sure if I bumped into this other doily enthusiast, we would probably get on rather well.  Spread the doily love!
 
 
Here's a little glimpse of what I've been working on:
 
 
I'm hoping to add a lovely large tear drop chandelier piece to this one, as I think it will work well with the shimmery voile and metallic threads.
 
 
Feeling inspired by all the wonderful sunny weather we had this week, I almost forgot myself as its now snowing.  I can't wait to get out in the garden and get planting!
 
 
A wee pink number.
 
 
Last but not least, my current favourite, as I love all the bright colours.  I am also rather fond of this little beige doily.

Wednesday 6 March 2013

Roses, turquoises and pinks

So far, so good. I am already about 180 (ish) squares into my next crochet project.  This is to be a large afghan to cover a double bed (400 squares approx.)  The colour scheme is light, dusky and dark rosy pink, turquoise, pale blue, green, off white and light purple.  I am also, although at a snails pace, working on a hand embroidered double quilt in simialr colours.

 
I have tried to work with yarn I've been given, and shape it into a project which works, rather than outright buying a whole bunch of new colours.  Not only does my purse feel the benifit, it encourages me to work with colours I might not necessarily choose.  It will look slightly different once it is laid out in its entirety, as there will be a more even spread of colours throughout.  So although I think I may need to buy a few odd extra balls once I'm further along, I'm not panicking just yet!


These are the other yarns I've not used yet (along with various repeats of all the other colours.)

Now, you may be wondering how I've had such a quick turn around between this afghan and the last...  Well, I can tell you that I'm not that super speedy at the old crochet malarky.  I was already part started on this project.  The two blankets started as one. (one large afghan for my double bed.)  Then I was given more yarn, had a change around of colour schemes in various rooms as they were slightly confused.  I ummed and ahhed a lot, and after much deliberation decided to split it into two projects.  The first, a large sofa throw (which I finished a couple of weeks ago,) and the second, a double bedspread.  This also explains why I am using the same pattern again.  I wouldn't normally (although I do really like the block effect of the colours in this pattern,) I would normally move onto pastures new and mix things up, so as not to get bored.  But I am technically recycling the left over squares, to finally complete the bedspread that I originally set out to make.  I do like to make things complicated for myself!
 
 
Now this is the quilt I am working on.  Some of the squares still have the water soluble pen in the background from where I've drawn the design on before embroidering.  I am waiting to wash it all out on completetion though, as I worry it may come appart where its tacked in place if I fiddle with it too much.
 
 
Hello, its a little birdy!
 
 
All the squares are different, from flowers to birds, words to tea cups, I've tried to keep the pictures as varried as possible.  I can tell you, that is hard with so many squares to fill!
 
 
Some lovely Tilda fabrics, and a small bird house :o)
 
 
Boing!
 
 
Not all of my squares line up perfectly, but as mum says "its the homemade look." And I hope that my pukka embroidery skills make up for that.  I never have been very fond of measuring and straight lines anyway!

Saturday 2 March 2013

An afternoon of sewing

Today I have been busy as a bee, sewing myself into a cross-eyed stupor all of the afternoon. 
 
 
I have made two tiny owl brooches, which I am hoping to add to my new Folksy shop in the next few days. (Need to work out the packing and logistics of the shop before I start selling.)
 
 
The brooches are all made by hand, with lots of teeny tiny embroidery stitches including back stitch, satin stitch and blanket stitch in DMC embroidery silks.


I also spent a pretty few hours on this little squirrel, who is made with a combination of machine and hand embroidery, including back stitch, French knots, satin stitch and a complicated one called battlement filling stitch.  I was going to make the squirrel into a little brooch too, but I quite liked the peachy orange colour against the rose print cream fabric.  I might keep him in the hoop yet and add a little more to the picture. I was thinking...
 
 
 I may applique the speech bubble and hand embroider the text with couching stitch.  Still in the thought process at the moment.  I don't know if its a bit inappropriate now I have a child, but she can't read yet, so I figure I can get away with it!