Showing posts with label Sewing. Show all posts

Saturday, 23 November 2013

Simple felty foods #2

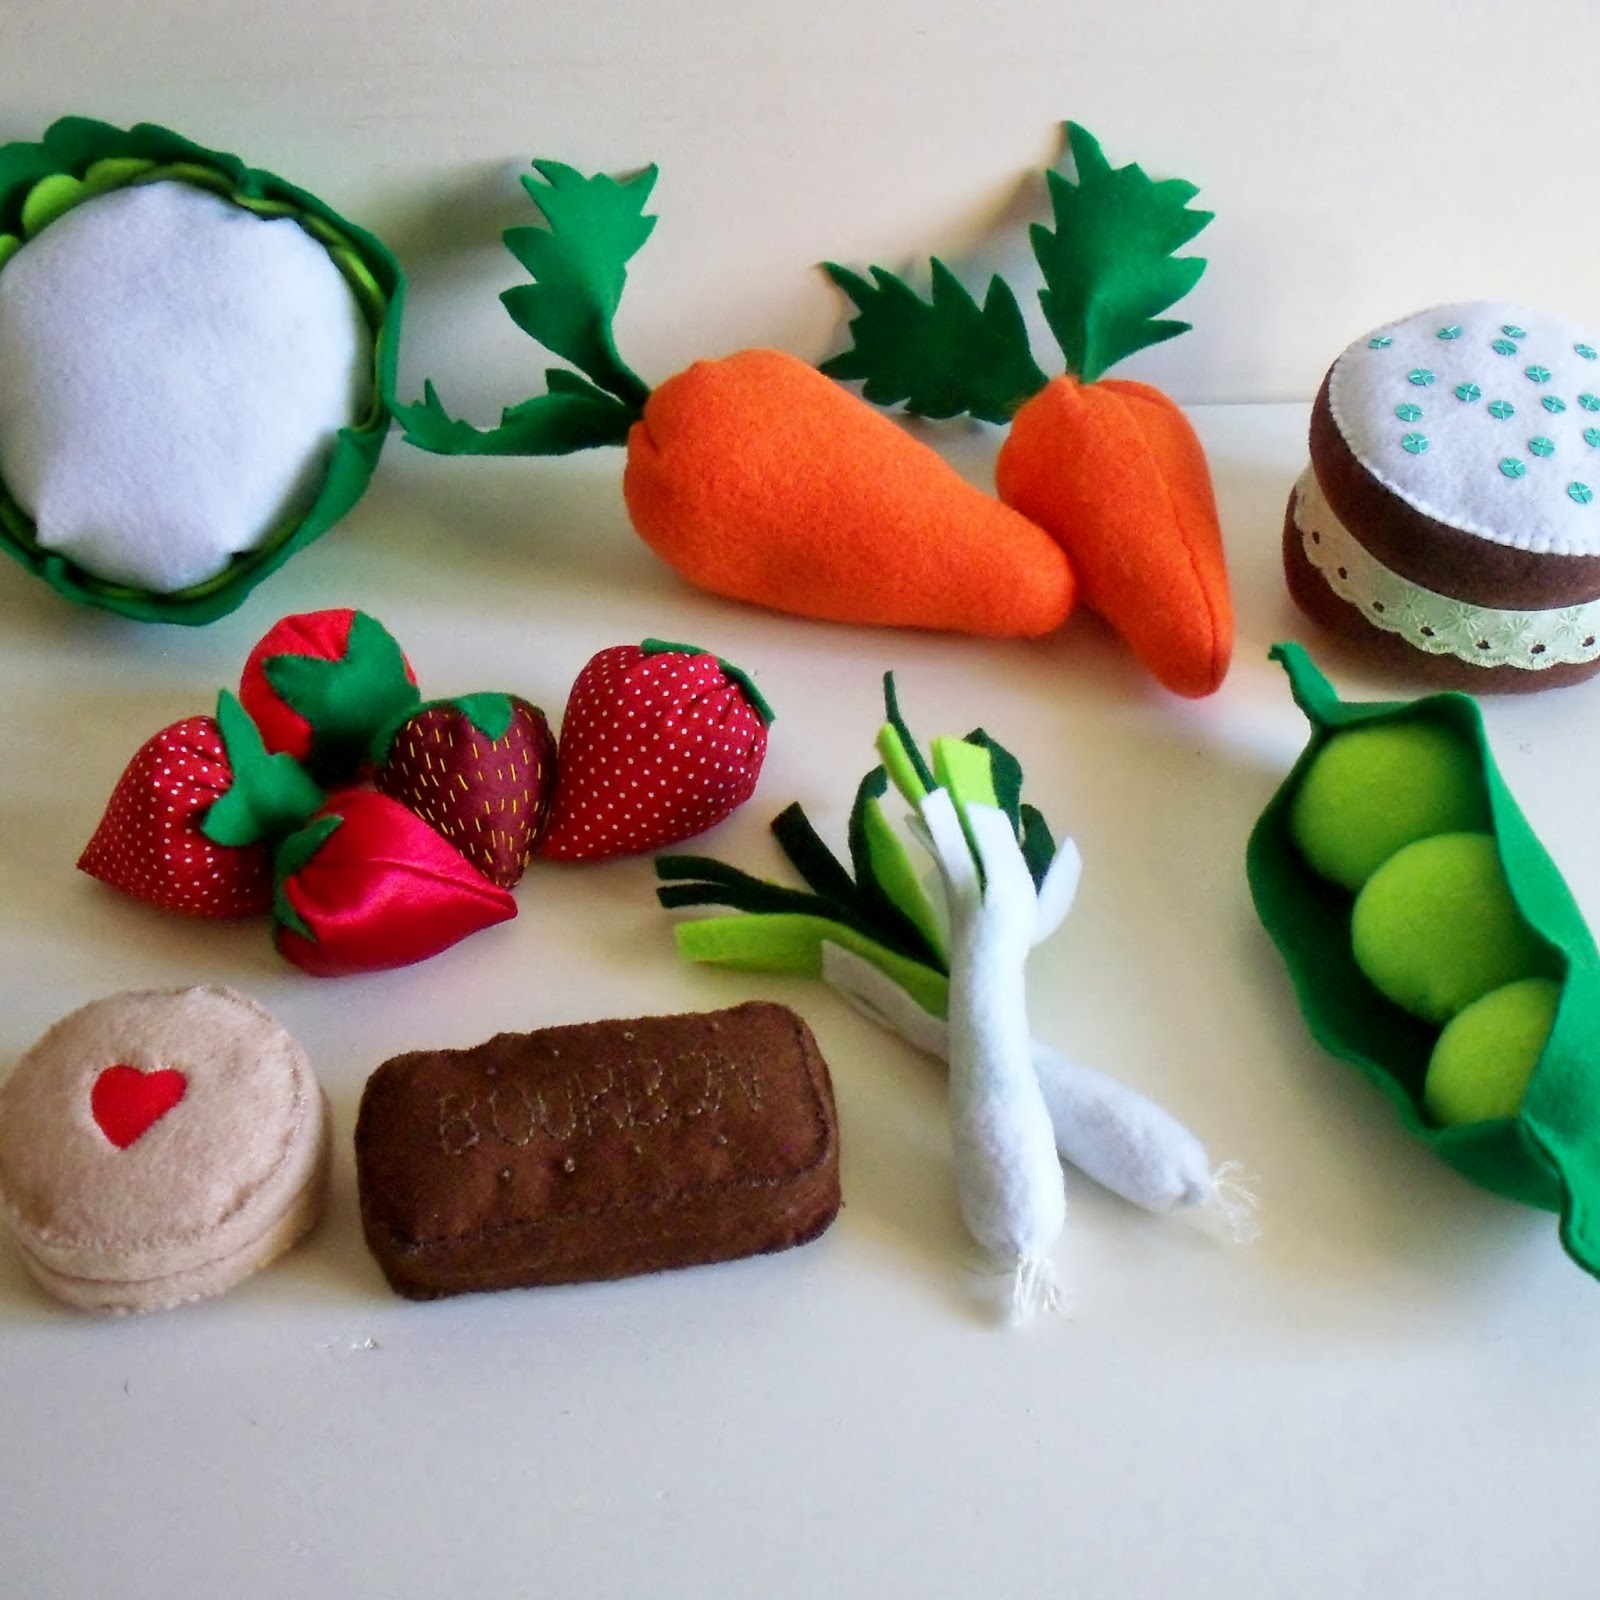
Last week I shared with you some pictures of the felt food toys I had been making for my little girl for Christmas.  Since then I've been going free-style and making the patterns up for the food as I go along.  It seemed a little daunting to begin with, but once I'd figured out how to make the basic shapes in 3D I was flying along.  Here's my progress so far...
 
 
The sausages were made with rectangles of pink felt rolled into tubes and simply whip-stitched along the length to hold in place.  The tube was then stuffed and both ends were drawn in, the strings were knotted off and then taken back through the sausage with a needle.  This helps hide loose ends and I also think it makes stuffed toys stronger and less likely to come apart.  The penne pasta was made in a similar way, instead of stuffing the ends were cut at angles and left open.

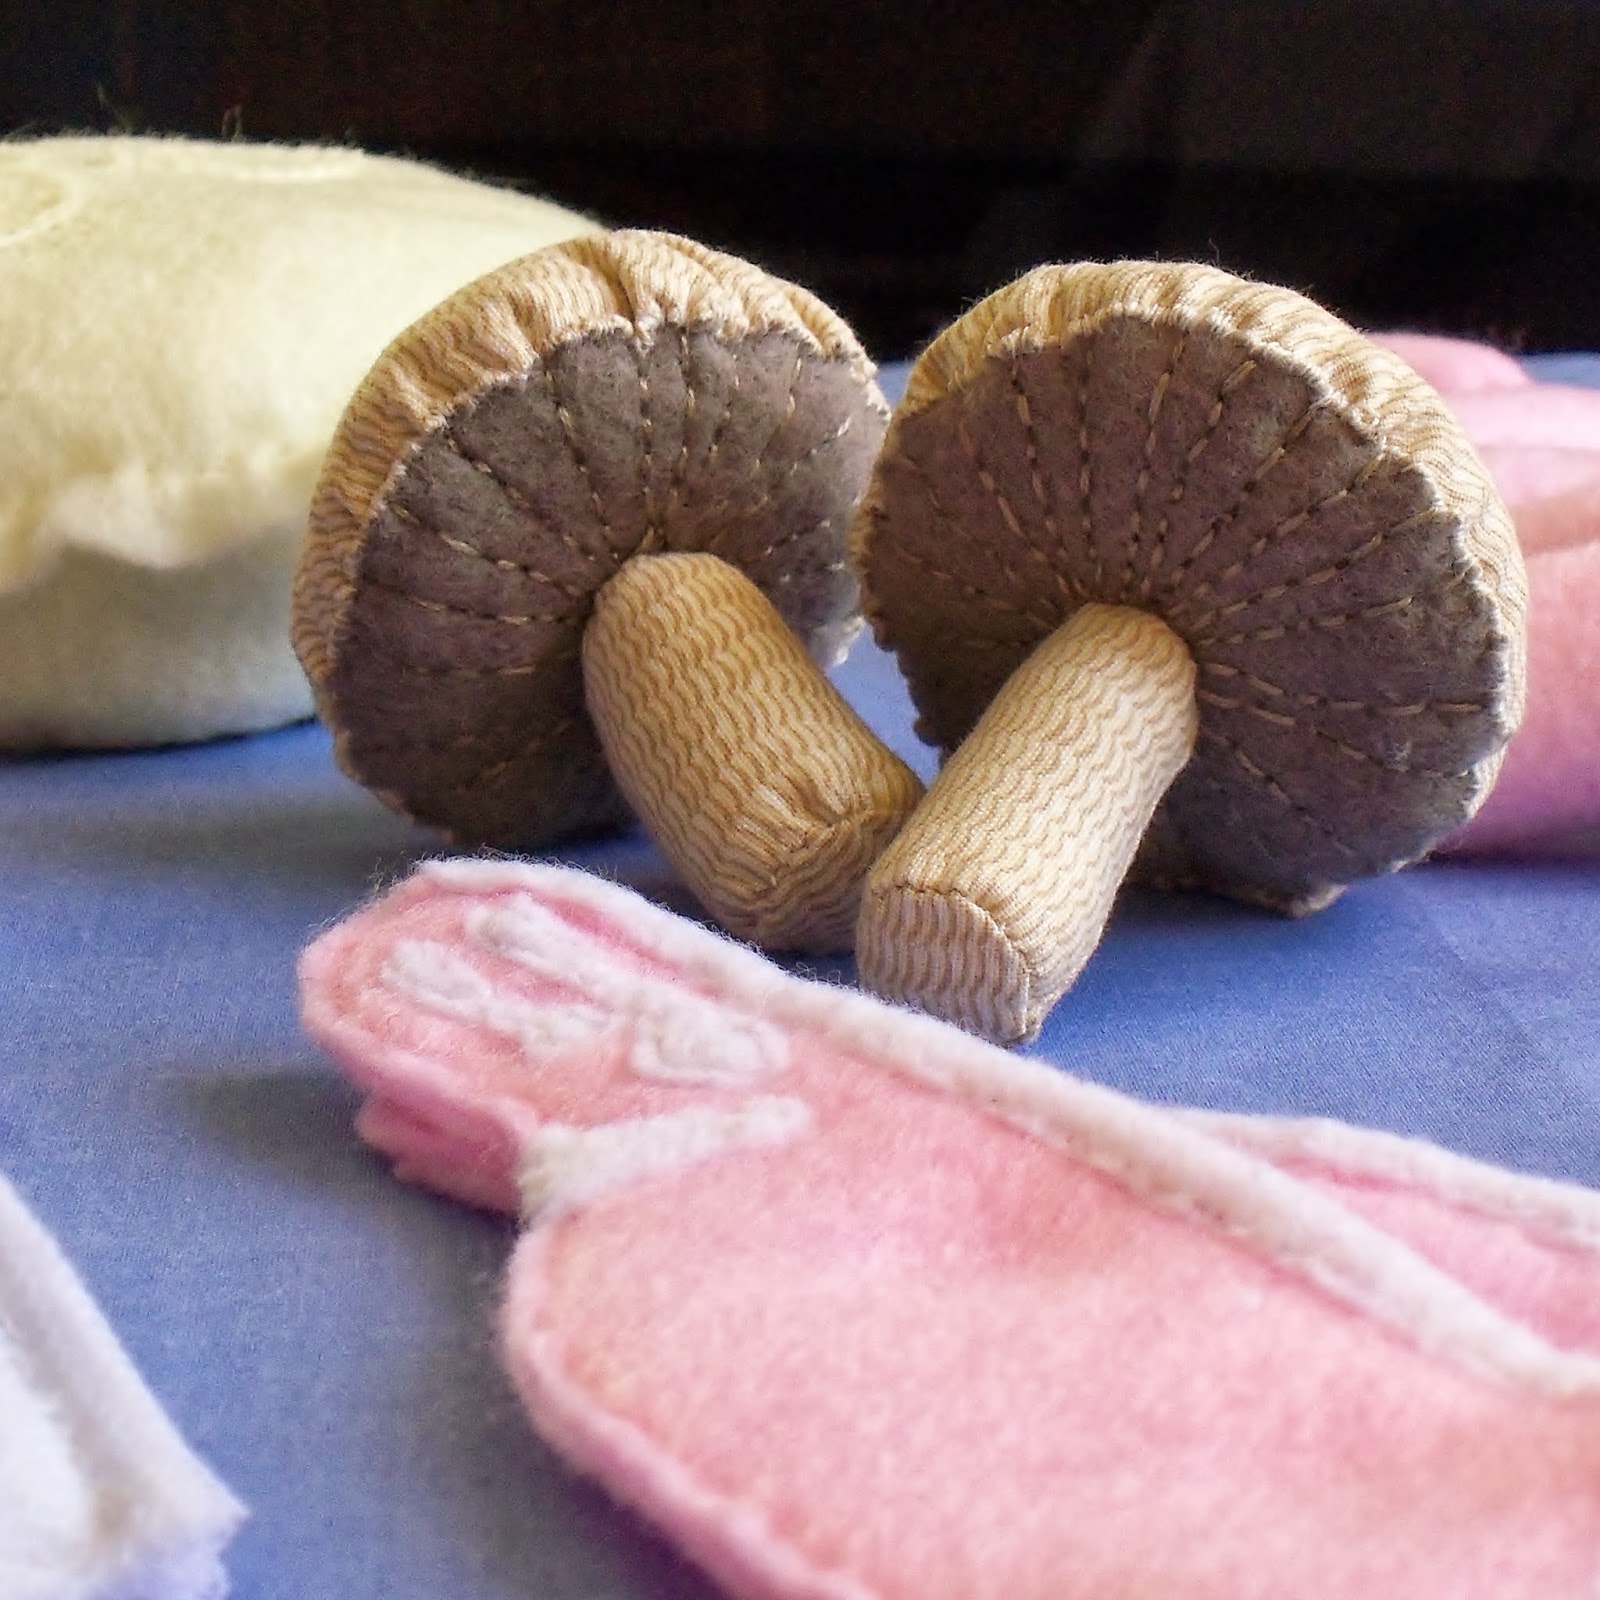
 
 The mushrooms were a bit harder to master.  Probably not helped by the fact they're not entirely made of felt, but I just couldn't resist using up this scrap of fabric.  It just shouted "mushrooms" at me!  The stalks were pretty simple (sewn inside out and then turned right way around and stuffed.)  The tops are made from two circles of fabric.  The top fabric had a diameter of approx 2cm more than the bottom, which I then drew in and turned under a small seam allowance as I sewed the two together.  The mushroom gills are embroidered on with a simple back stitch.


 I just love these little prawns!  They were a lot simpler to make than they look... I am thinking of doing a mini tutorial for them though, as they may need a few photos to help with the explaination.


These tea bags aren't the most realistic looking, but I really wanted to add a little colour and fun.  I really have a thing for sequins, use them wherever and whenever I can!  Thinking of doing a mini tutorial for these too as I'd really like to share with you how I have sewn the strings in safetly and securely... Nothing worse than a toy that is a choking hazard, or one that falls appart on Christmas morning!

Are you making Christmas gifts this year?  Leave me a link in the comments below, I'd love to see what you've been making too.

Next on the agenda for me... a roast chicken I think, eep!

Monday, 11 November 2013

Simple felty foods

Earlier in the year I posted about the felt sandwich toy I made for my daughter's second Birthday.  It proved to not only be a hit with my daughter, but has become one of my most viewed blog posts, so I thought I would share with you my plans for some more felty food toys I'm making my little one for Christmas.
 
I had this idea to make lots of bits and pieces for a kind of shop/market for my little girl.  So far I have been warming up by stitching some simple felt foods mainly from existing patterns which I've saved from old craft magazines.
 
 
Techniques so far have included sewing 3D cylinders, circles which are drawn in and stuffed (similar to making a Suffolk puffs,) and also tubes and cone shapes, both with drawn in ends.
 
 
OK so these strawberries aren't entirely felt, but they were so simple to make!
 
 
The carrots were made using the same kind of technique as the strawberries.
 
 
I particularly like this simplified version of a jammy dodger, from an old Mollie makes magazine.
 
 I do love sewing with felt, it's both easy and satisfying.  None of that stressing over fraying seams and lots of quick and easy whipstitching!  I've already made some felty sausages and bacon since taking these photos and have plenty more foodie makes planned, which I hope to share with you over the next few weeks.
 
Are you planning a handmade Christmas this year?


Sunday, 20 October 2013

Garden embroidery

Today I am finishing off a garden themed embroidery that I have been working on for a little while now.  She is to sit in a little rectangular frame I jazzed up (or jazzed down, as it was turquoise with a picture of FOUR TROUTS, (yes as in the fish,) and is now trusty old cream!)  Hopefully she will help to brighten the walls of my living room on this grey day...

 
I am missing all the sunshine already.  Standing on one leg, stretched out with tinfoil in my hands, trying desperately to reflect some light into these photos... Oh the glamour!
 
 
P.S. Don't tell anyone, but I've been watering my plants all summer with water from washing up bowls, not a posh watering can!  Happy Sunday all x 
 

Thursday, 17 October 2013

Hot make for the cold months!

Hello!  I have been absent from my blog for a while now, lots of making going on, but a lack of blogging.  As the time passes, it's been harder and harder to get back into the swing of things! 
 
I thought I would come back with an easy sewing project ready for the cooler weather, that you could also make as a Christmas gift.  *Gasp!* It may be a little premature, but it is already on my mind, and if you are making gifts this year, you need to be planning ahead!
 
Before I show you my make, here's a little catch up...
 
 
During late summer/ early autumn I have: 
  1. Finished my double quilt. I'm not entirely happy with it, but it is such a load off my mind.    That is ALL of the FOUR jumbo unfinished blanket projects I started the year with, done and dusted (I must be mad!) 
  2. Sewn a mish mash patch work curtain for my back door, readying the house for the cold weather.
  3. Preserved what can only be described as THE bumper crop of plums.  Jam, chutney, pies, sauce and bags and bags of frozen plums to see us through the year.
  4. Been doing more jam making with blackberries and lots of lovely chutneys from the crops in our garden.
  5. Sewn a few smaller projects.
  6. Had my car in the garage three times, argh!
  7. Sorted wood, kindling, coal, chimney sweep in prep for fire lighting.
  8. Enjoyed a mini beak to Cromer in Norfolk and a mini break to Sheffield.
  9. Been drowning in free apples.
  10. Painted our bathroom (only two rooms to go whoop!)
  11. Crocheting a blanket for my little girl's bed.
There's probably more, but that's just off the top of my head.  Here's my little sewing project...


Winter Warmer How-To
Mini hot water bottle cover
 
This cute little hot water bottle cover was so simple to make! 
And best of all, if you're making it for yourself or as gift,
you can customise it as much as you like!
 
 
You will need:
 
A small hot water bottle
Cereal box for template
A pen to mark card and a fabric pen
Two large pieces of felt in hot pink and light pink
Sewing needle
Scissors
Pins
Sewing thread in hot pink and brown (to match felt and another to match your patch)
Embroidery thread in blue
Sew on/ iron on embroidered patch
 
How to:
 
1.  Draw around your hot water bottle onto the cardboard, leaving a 1.25cm border.  Leave a wider space around the neck of the hot water bottle, as in the photo below. 
 
 
2. Use the cardboard template you made to create two templates for the back of the hot water bottle cover.  (See photo below as a guide to where to place envelope opening.)  Remember to leave approx 1cm overlap for the two back pieces.
 
 
3.  Draw around templates onto both colours of felt and cut out pieces.
 
4.  Pin and sew together light and hot pink pieces using backstitch or running stitch and hot pink thread, leaving 0.25cm seam allowance around the pieces.
 
5. Sew on embroidered patch. I used brown cotton so the stitches were invisible.
 

6.  Draw on words with fabric pen.  I used couching embroidery for the lettering.  (Basically couching is attaching one thicker thread by using lots of little stitches and a smaller thread.)  I used three strands of blue embroidery thread and couched over it with the same hot pink thread I used to backstich the pattern pieces together. 
 
If you're not sure about couching, a simple back stitch or a split stitch would certainly do the job.
 
7.  Blanket stitch the two edges which will form the envelope opening.
 
8.  Pin all the pieces together, making sure that the right sides are facing out and blanket stitch around the whole cover.
 
 
9.  Fold back envelope opening and insert hot water bottle.


 Taah-Daah!
 
The colours really do sing sing.  The pink and blue make your eyes go a little crazy don't you think?


Monday, 1 July 2013

Love is all you need...

Hello, apologies its been such a long time since my last post.  The reason behind this is my daughter and her naps... or lack or them.  The terrible twos have hit and now I am no longer getting my window of crafting time.  I swear there are not enough hours in the day! 
 
I finally got to do some sewing at the weekend and was feeling inspired by a "HOME" picture I had seen ages ago by Dottie Angel, with a doily for the O in HOME (sorry I can't seem to find the original photo anywhere, but it was very similar to this image.) So I donned a floaty skirt to get me in the vintage sewing zone and set to work...
 
 
I have had this old picture frame (which I saved from the dustbin/freebie) knocking around for ages, and all the fabrics were either thrifted or from my scraps box.  The letters were all machine sewn on and I hand stitched the doily on around all the twirly whirly hoops with contrasting pink thread.  (It took a very long time!)
 
 
I also hand sewed this little hanging heart, to sit alongside the picture frame.
 
 
I even gave cross stitch a go for the first time in about twenty years.  It really was quite therapeutic! 
 
 
Slowly our little housie is becoming more and more homely... 
 
 
Happy little housie, happy little me :o)


Friday, 31 May 2013

Dolly Dress a Day

Hooray!

I've done it!  ...I've finally finished making and even wrapped all my daughters Birthday presents ready for the weekend!  This is the second of two gifts I've been working on for my soon to be two year old daughter. (Wow, where have the last two years gone?!)
 
Meet Matilda;
 
 
How do you do?  Oops where are my clothes?!
 
The doll is based on a pattern from a book called, Wee Wonderfuls: 24 Dolls to Sew and Love, by Hillary Lang.  (I have just discovered she also has an awesome blog: http://www.weewonderfuls.com/ check it out!) 
 
I kept the doll pattern the same as in the book, using cotton instead of felt for the body, simply because the only felt I had that was large enough was totally the wrong colour (bright pink felt makes for one sunburnt looking doll!)  Also keeping the legs skin coloured rather than patterned as in the book...  This was because I wanted to change the dress pattern for the doll.  The original doll had a fixed dress and I wanted to make the dress removable and make several dresses, to help expand on play themes.
 
So far I have managed to make Matilda three outfits...
 
 
A floaty, casual day dress. 
(Check out the actual fully functioning patch pocket with cupcake detail- so cute!  The little cupcake, which I bought here, was the insipration for the whole doll really.)
 
 
A smart evening dress.
 
 
And a boom boom pow, beach dress!  (Couldn't resist adding the pom pom trim!)
 
 
The dress in the book was made from two pieces of fabric the same size, sewn together, then the neckline gathered once on the doll and then the bottom was sewn up either side of the legs.  I simply made the back panel slightly wider (allowing for two extra seams) and split it into two pieces, with a small piece of velcro for fastening.  I then did a simple running stitch along the neckline, pulled threads to gather material to desired length, tied off ends and hand stitched neat trims along the top edge.
 
If I were to make another dress, I would probably make the arm holes slightly larger, as I think my daughter will need help to thread the arms through the sleeves.  I got quite whizzy by the time I was on the third dress, but left it there as I am feeling quite poorly now after having had a cold, followed by too much sunshine at the weekend and terrible heat exhastion and now a terrible chesty cough.  I could really do with a rest... does this mean I can start a new project this evening?!
 
...I have also finished my latest crochet blanket, but need to give my bedroom a good tidy before taking photos of the finished item for my blog.  This has left me at a complete loss of what to do with any spare time I would have previously spent crocheting.  I have no "go-to" project, that I can pick up and put down when I have a spare 15 minutes. 
 
I hope you all have a wonderful weekend and fit in a little making with all the sunshine. Happy summer everyone!

Tuesday, 28 May 2013

Soft sandwiches & felty fillings

I have been rather quiet this past week.  The reason for that is that my daughters second birthday is fast approaching.  As always I have bitten off more than I can chew with the making of presents (along with shopping, party food, my partners Birthday also this week, possibly two Birthday cakes, I feel quite stressed!)  When will I learn to start making sooner and not make things so complicated?! (probably never as I like to be busy and with me, the more complicated the better... no sympathy here then!)
 
This is the first of two toys I've been making her.  Some of her favourite toys are her plastic food things, so I wanted to add and expand on this play by making a soft sandwich.  I am hoping it will encourage more interactive play, talking about fillings, choosing different combinations, stacking the layers and probably a lot of bringing mummy different sandwiches.
 
 
I have seen some toys similar to this available that are made from wood, but when I saw the price I was like, HOW MUCH?!  Present buying gets so expensive and I refuse to spend loads on something I know full well I can make from bits and pieces in my stash.  While my kid is young and I can get away with it, I will!  I don't really see how such small hands are supposed to pick up a chunky wooden sandwich anyway, without it falling to pieces... leading to frustrated toddler tantrum! 
 
I really enjoyed working with the felt for a change (with the exception of the bread being cotton, the slice of ham was made from pink corduroy and the egg yolks a piece of nylon.)  It was nice easy sewing and the simple embroidery details were also fun to do.
 
 
The felt was limiting only in the fact that it is impossible to make sandwich fillings such as tuna and egg mayonnaise... I think however it is probably impossible to make these with anything other than actual tuna or egg!
 
 
I didn't use any patterns when making this project, as it was all fairly 2D, so everything was drawn out freehand.  This project was all hand sewn, with the exception of a quick whizz around the sewing machine on the cucumber and tomato, before hand stitching them... As I'm typing this, I realised I still have a little making to do as I've forgotten to make lettuce, DOH!
 
 
Chicken salad sandwich? ...Don't mind if I do!
 
 
A giant Scooby-Snack also looks quite good!
 
I am also working on a second present for my daughter this week, which is a doll with (hopefully) two or more dresses.  I have all the pattern pieces cut out so far, so fingers crossed I get it put together in time!  What have you been making?  I would love hear about your current projects.
 

Sunday, 28 April 2013

Don't mind if I do!

Hello, Happy Sunday!
 
I just thought I would share with you my lovely haberdashery purchases.  Its PearlyPea's Birthday this week coming and I was given an early gift of moneys.  Having a kid, I'm not used to buying myself "things" anymore, so unsure what to get myself I headed to my favourite little fabric shop... which is not so little and sells far more than just fabric!
 
I have loads of fabric already, in all sorts colours.  This is great if you want to make a rainbow, but not so good for colour schemes around the house!  I just never seem to be able to find the right fabric from my stash.  Plus you can never have too much fabric, right?
 
 
Firstly I picked up two more balls of Sirdar Snuggly double knit, to finish of my large crochet blanket project, (its getting there... I will update on its progress during the week.)
 
The three pieces of fabric on the bottom row are fat quarters for sprucing up my living room sofa.  I have just finished painting the fireplace wall in a really fresh looking pale green, that I mixed up from two other paints we had sitting in the shed, from our previous house.  Thrifty!  So now the colour scheme is starting to make sense in my head, I can add lots of little colour accents.  Of course nothing really "goes,"  as I have quite eclectic taste.  (I love that there is such a positive word for being mismatched!)  Anyway, I always think matching brown, with brown, with brown, or red, with red, with red, is really not very hard or creative! 
 
I just love the little tree fabric on the right!
 
The two pieces of fabric at the top are larger bolts of fabric, from the end of rolls.  I like  checking what bolts are available, as there are often popular prints, which are discontinued.  Fat quarters are better on the purse, but can be a little limiting due to their small size.
 
 
Since joining #PostCircle a few months ago, everything letter themed has caught my eye.  I thought I might turn this rose and letter print fabric into a lovely table cloth.  (You can find out more info on #PostCircle over on miss-beatrix blog.)
 
 
More rose print fabric, this time with a yellow pattered background.  Not really sure what I will turn this into just yet.
 
 
Last but not least, who doesn't love a miniature cake?!  These are not much bigger than a five pence piece.  I will add these to something for my daughter, as it will soon be time to get making for her Birthday.
 
The best part about today is that this little lot only came to £30.00, leaving me £20 cash, and...
 
 
...upon paying for my items and getting my loyalty card stamped, I received a £10 voucher, KERCHING!  Must be used within 6 months, so I may have to take another trip there very soon!
 

Saturday, 20 April 2013

Pretty as a picture!

Since we moved house earlier in the year, I've found that we have this wonderful thing called wall space.  This is the first house that I have lived in that actually has room to hang more than one picture in each room.  So now I have the little task of filling my walls with beautiful things.  I've been working on two little pictures.
 
 
This first one I've had sat in a box for a long time.  I actually rescued it from the dustbin.  If you see a pair of legs sticking out of a wheelie bin, just Holla!  I just loved the little hot air balloon  The little caption at the bottom says, "THE FLIGHT OF CHARLES LACQUEHAY - 1802 PARIS."  I've always thought that the frame was a bit odd looking (its pine with no glass.)  Pine makes me feel a little sad.  It looks so lovely when its new, but after a few years it goes all funny and orange!
 
 
...So I've given it a fresh coat of cream paint.  Homebase Classic Cream, quick dry satin to be exact.  Lots of things in my house have been painted with this, firstly because if it was a colour I would probably get bored with it and have to repaint, yawn!  Also it goes with lots more stuff.  Lastly I figured that Classic Cream, being so classic and all, will hopefully never get discontinued.  So, I should have a lovely supply of cream paint for many years to come! :o)  It looks lovely above my telly (my massive telly is however not so lovely!) Every time something comes on I don't like, I can just gaze dreamily at my little balloon picture.
 
My second project was a deep picture frame, which had also been sat in a box for many moons.  Enter 3D items, HOORAY!
 
 
This one also got a new coat of cream paint.  I've filled it mostly with items that I picked up from last weekends carbooty!  (I picked up a little basket crammed with sewing bits and bobs for £2.)  With the exception of the tape measure that I've had for forever, which is really worn and part missing between zero and one inch measurements.  Not particularly useful, so in it went!  The doily I picked up a couple of months ago and have been wondering what to do with it as it is too three dimensional to put behind glass and far too delicate to sew onto a cushion.  If I sneezed, it may disintegrate!  Also the backing fabric is a fat quarter from my stash.
 
 
So first of all, holding my breath I pressed both the fabric and the little doily.  No sneezing!  I put the fabric in an embroidery hoop and carefully pinned and then sewed the doily into place using matching thread.  I then taped the fabric to the back part of the frame using brown picture framing tape, making sure that the corners were neatly folded.  I then mocked up a good composition for my haberdashery items and glue gunned them into place.  Put the back onto the frame and secured all with a little more brown tape!

Tuesday, 16 April 2013

Carbooty finds!

Firstly I would like to apologise for being absent without leave for the last few of weeks.  Its been a combination of feeling really run down with a mouth full of ulcers for two weeks solid, a bad back and trying really hard to get some of our house painted (that needs doing from top to bottom,) that has left me with little energy or enthusiasm for blogging of recent.  I have still been around, and have still been silently making away.  So now I am feeling much better (excluding the sore back,) lets get this blog ticking over and have a little catch up!
 
At the weekend I had my sister @LovelyThings2 come to visit from Sheffield and we spent much of the weekend rooting around at three carboot sales.  We almost got blown away at the last one as it was so gusty, and came home with what looked like a lovely light spring tan... on closer inspection it was a peppering of dusty carboot earth, lovely! 

I have a terrible habit of putting the brakes on any spending, as its hard just making ends meet these days.  Buying anything that is not for my family to eat goes against all of my instincts, but seeing as it was all second hand and all dirt cheap, I feel slightly less guilty.  Here are some of my thrifty finds:
 
 
The two large pieces of material (top left) are a thin sheet (blue and white) and curtain made from thicker material.  They were only 10p each!  I'm sure they will come in handy for a project somewhere down the line, even if its just to make a tent in the summer time for my daughter.  Where can you buy anything for 10p these days?!  The piece of fabric at the bottom left is an embroidered table cloth in excellent condition for £1.  The book, "Stumpwork," by Kay Dennis was also only £1 and is full of lots of photos and techniques for wonderful raised embroidery designs.  Ideas and techniques that go far beyond anything I could have possibly dreamed up!  I have the machine embroidery book from this series and was so happy to find it at a bargain price.  I can't wait to try out some new techniques!
 
Top right is a lemon juicer for 20p.  I have been looking out for one of these for ages.  Its one of those items that will get used rarely, but do you know how hard it is to get juice out of a citrus fruit without one of these little bad boys?!  Also a tiny lidded metal saucepan 20p, for my little girl, "mummy making porridge," too cute!
 
 
Random Coleman's Mustard powder shaker for 50p. Apparently it is "Fit for a King" and "Used in the Royal kitchens."
 
 
Teapot shaped tea infuser, like new for 50p.  So dinky, just had to have it!  Two miniature houses and what looks like a chapel all for 60p.  Looking quaint on my mantle piece right now :o) Two pieces of crochet lace for 30p.
 
A greeny teal knitted cardigan for the grand sum of £1.  Looks like its never seen any wear.  Its acrylic, which is ideal for me as my skin is sensitive and anything with even a whiff of wool in sends me into an insane itch!  I can't find any labels inside and from the general shape and how the buttons are attached I would say its been lovingly handmade by someone.  I feel funny whenever I see handmade things going second hand.  Someones put so many hours of love into making this cardigan.  I see this as a rescued item and I'm sure I will wear it to death.  I only wish that the other dark turquoise cardigan with it had been a little smaller as I would have snapped that up too!
 
 
Here is a little close up.  Its a greeny flecked with turquoise kind of wool.  Not sure what stitch it is as I can't knit.  I will learn one day, I WILL!  May have to switch the buttons for something a little more jazzy tho, as brown is totally not my favourite colour.
 
 
Last but not least this little lot was in a basket along with some other junk for £2.  The stall holder was practically throwing this at me at the gusty dusty carboot, as everyone was seeking shelter and packing up for home.  I can't believe this was still sat there at the end of the carboot.  I'm in Norfolk UK, if I lived in a more creative area this would have totally been snapped up by some eagle eyes!  It also came with a large doily on top, which I unfortunately can't show you (along with a bunch of other doilies I picked up on another stall,) cos they're in the sink having a little hand wash. 
 
 
I'm glad I didn't go in all guns blazing, as the basket was also full of lots of metal pins and also a bare naked razor blade.  Eek!  I think the owner of the sewing kit was using it to cut cottons instead of scissors... that is real make do and mend there!

 
Really chuffed with all my little finds, hope you had a lovely weekend too :o)