Showing posts with label felt. Show all posts

Saturday, 23 November 2013

Simple felty foods #2

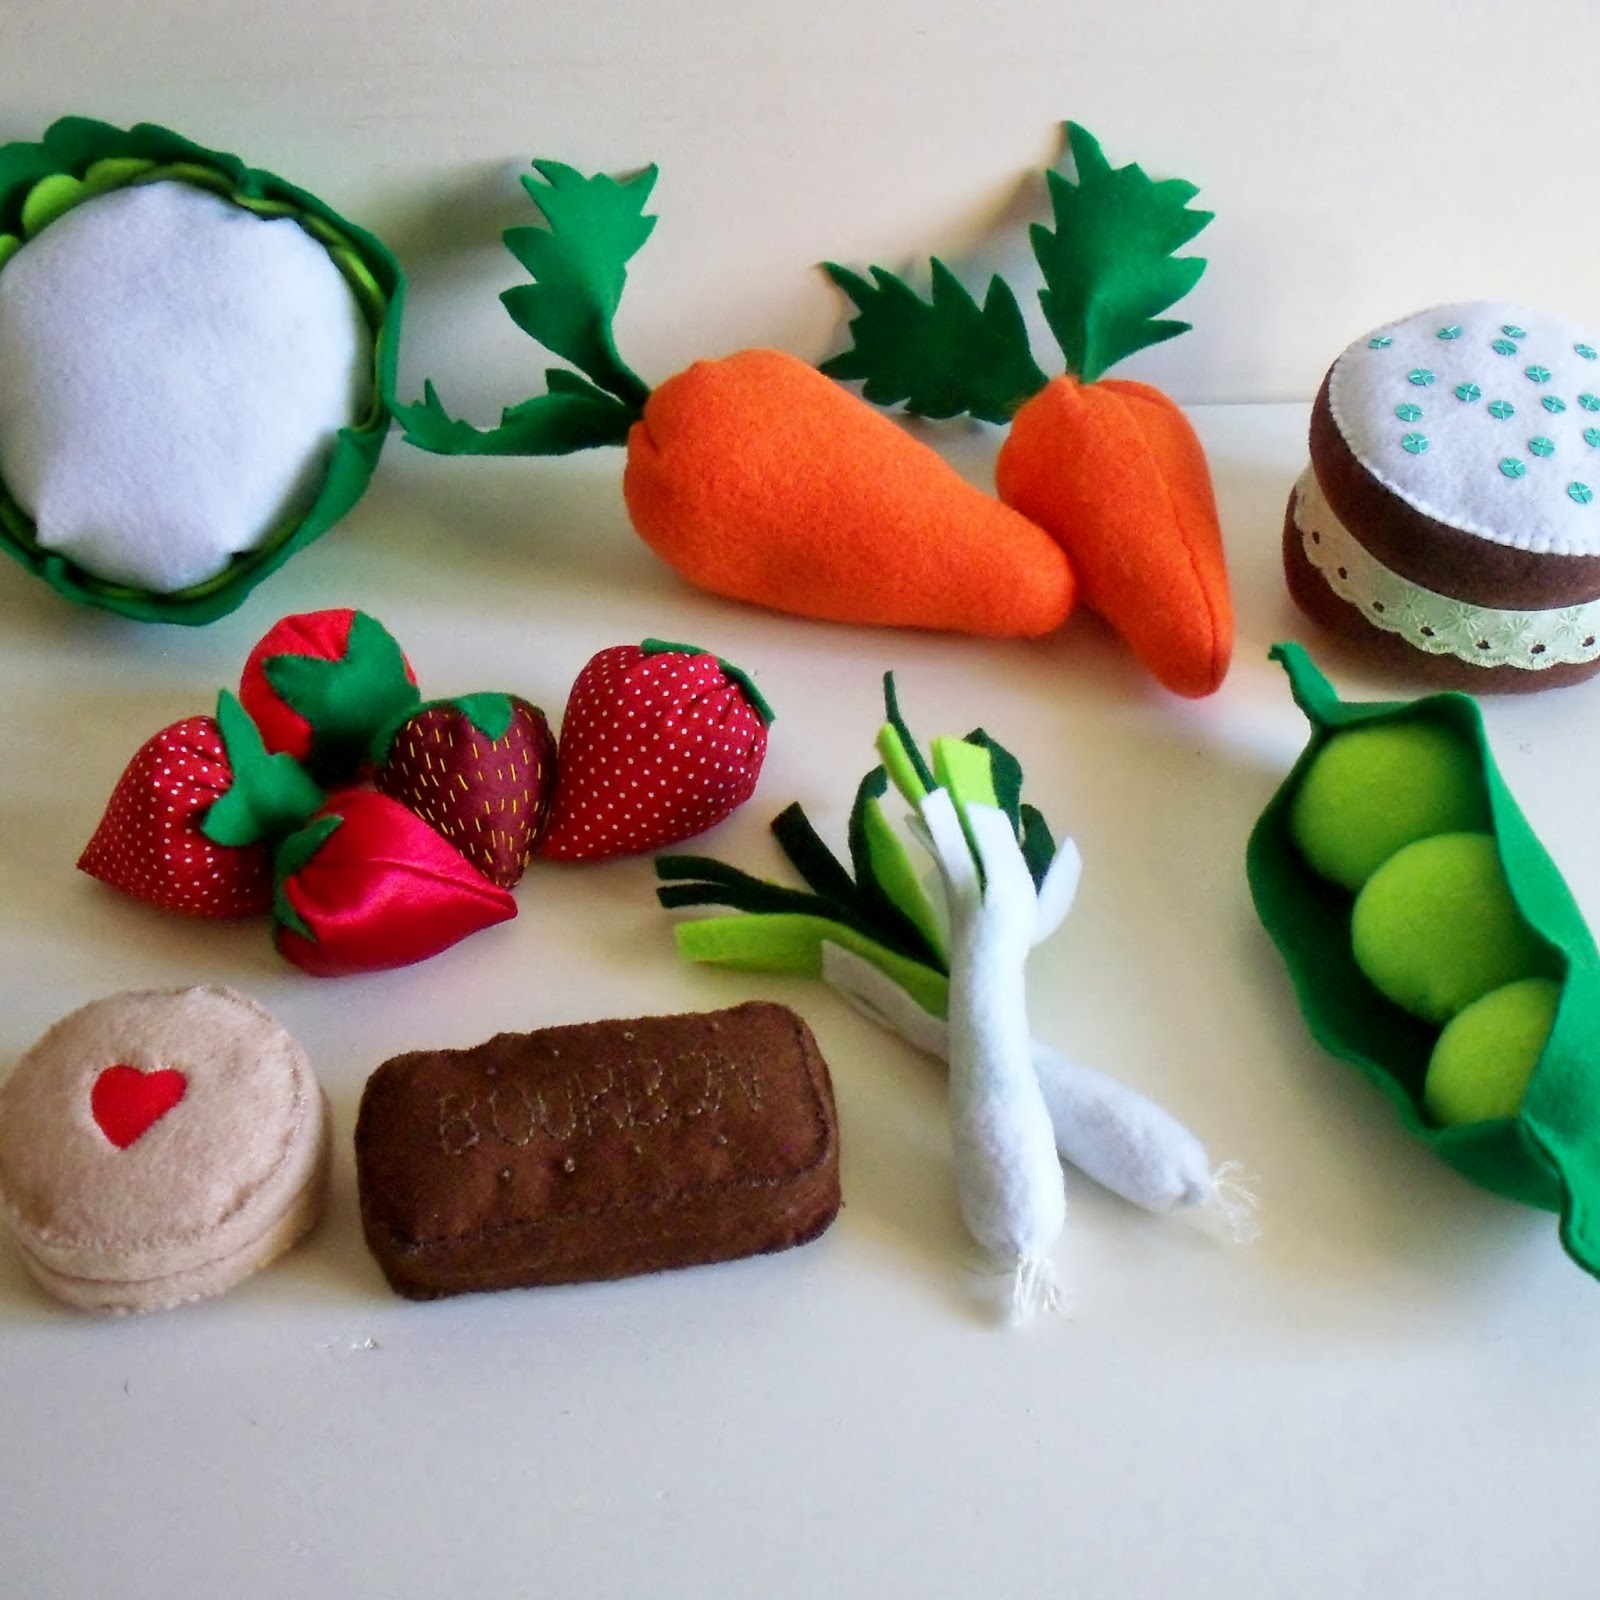
Last week I shared with you some pictures of the felt food toys I had been making for my little girl for Christmas.  Since then I've been going free-style and making the patterns up for the food as I go along.  It seemed a little daunting to begin with, but once I'd figured out how to make the basic shapes in 3D I was flying along.  Here's my progress so far...
 
 
The sausages were made with rectangles of pink felt rolled into tubes and simply whip-stitched along the length to hold in place.  The tube was then stuffed and both ends were drawn in, the strings were knotted off and then taken back through the sausage with a needle.  This helps hide loose ends and I also think it makes stuffed toys stronger and less likely to come apart.  The penne pasta was made in a similar way, instead of stuffing the ends were cut at angles and left open.

 
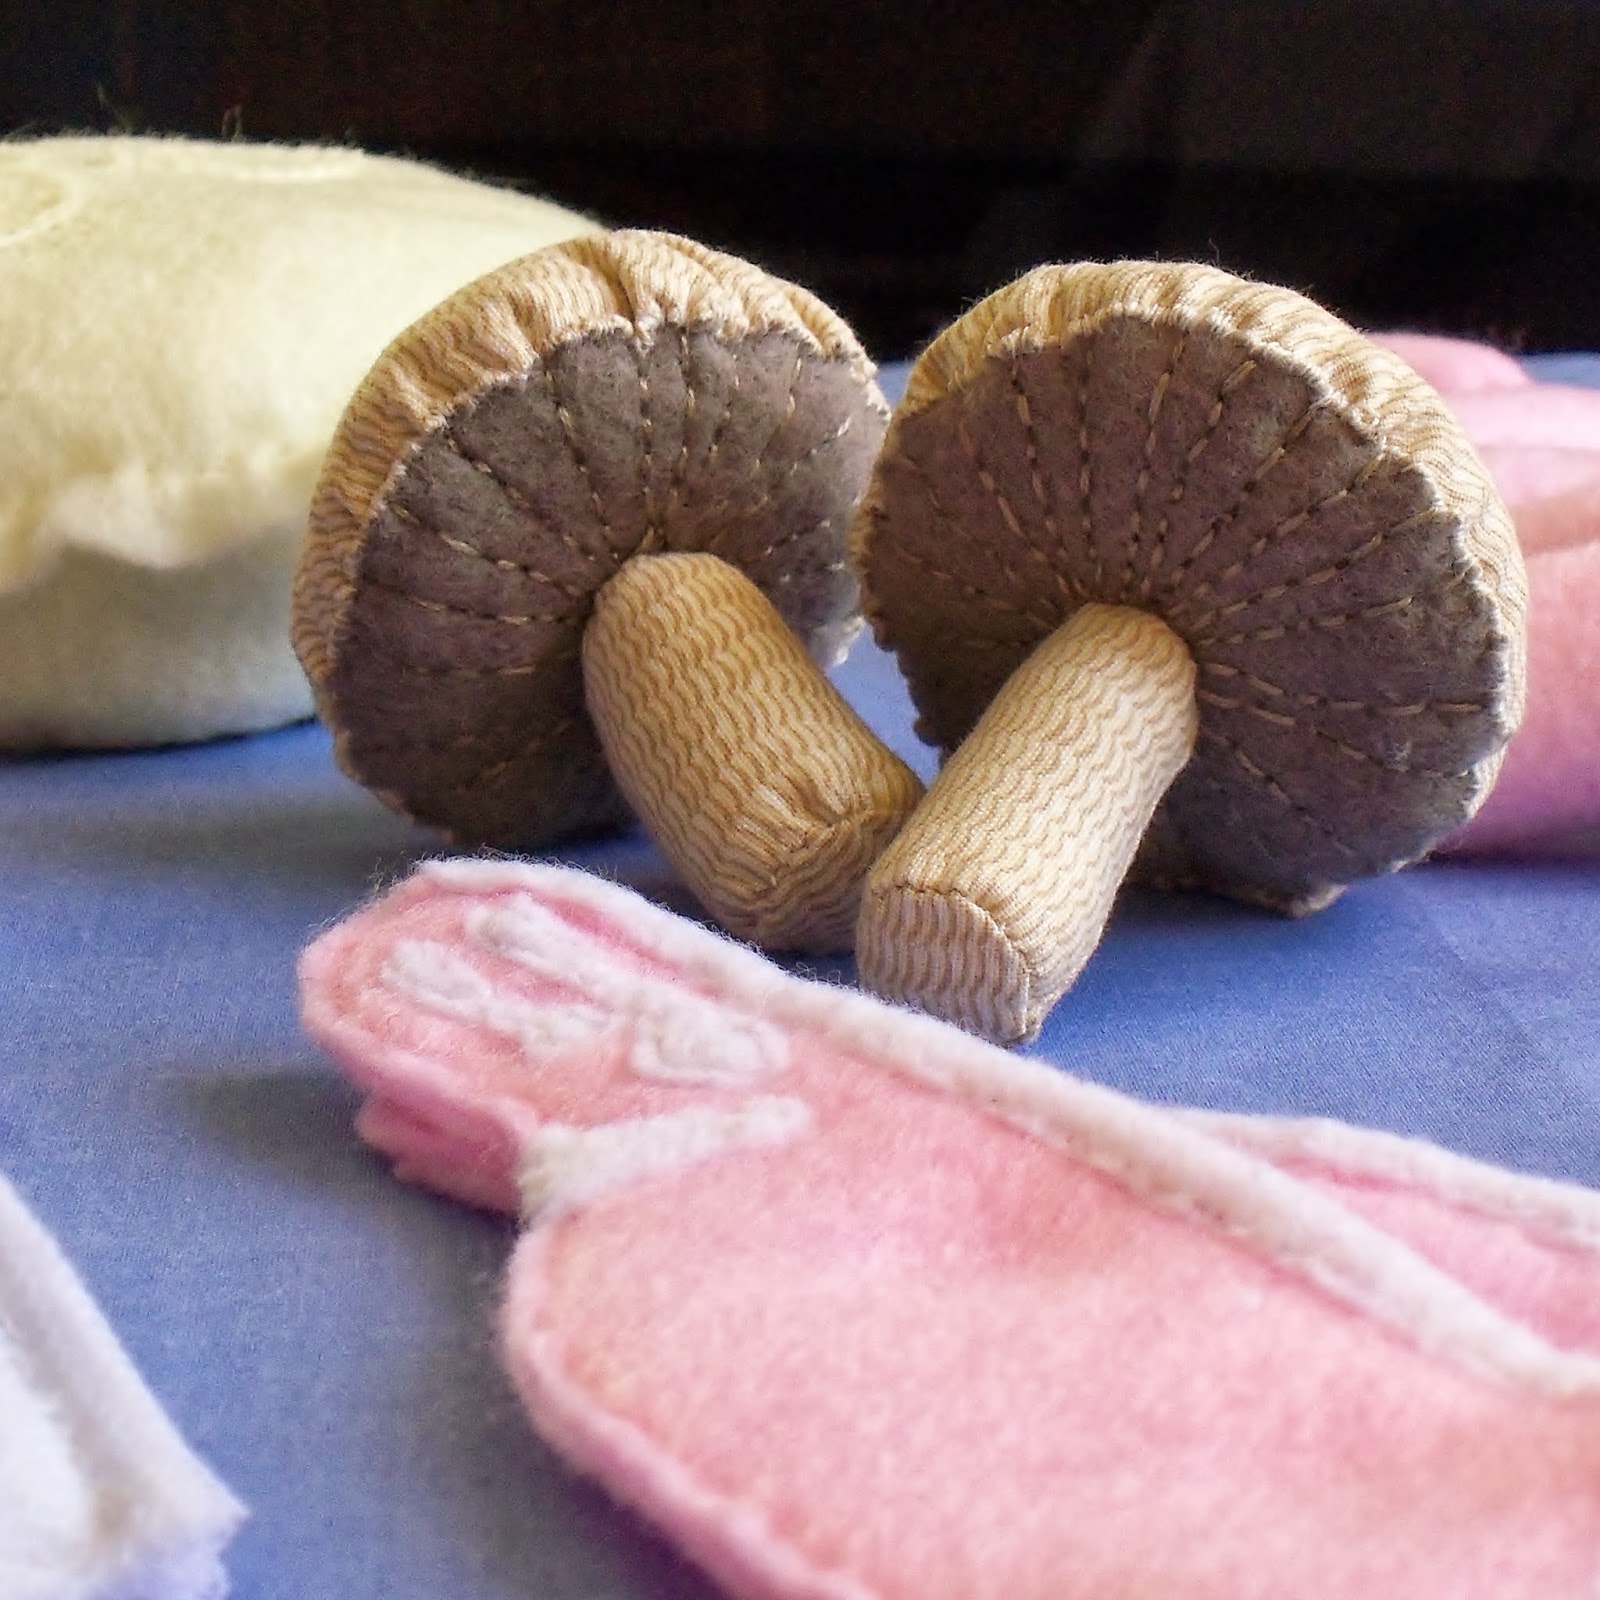
 The mushrooms were a bit harder to master.  Probably not helped by the fact they're not entirely made of felt, but I just couldn't resist using up this scrap of fabric.  It just shouted "mushrooms" at me!  The stalks were pretty simple (sewn inside out and then turned right way around and stuffed.)  The tops are made from two circles of fabric.  The top fabric had a diameter of approx 2cm more than the bottom, which I then drew in and turned under a small seam allowance as I sewed the two together.  The mushroom gills are embroidered on with a simple back stitch.


 I just love these little prawns!  They were a lot simpler to make than they look... I am thinking of doing a mini tutorial for them though, as they may need a few photos to help with the explaination.


These tea bags aren't the most realistic looking, but I really wanted to add a little colour and fun.  I really have a thing for sequins, use them wherever and whenever I can!  Thinking of doing a mini tutorial for these too as I'd really like to share with you how I have sewn the strings in safetly and securely... Nothing worse than a toy that is a choking hazard, or one that falls appart on Christmas morning!

Are you making Christmas gifts this year?  Leave me a link in the comments below, I'd love to see what you've been making too.

Next on the agenda for me... a roast chicken I think, eep!

Monday, 11 November 2013

Simple felty foods

Earlier in the year I posted about the felt sandwich toy I made for my daughter's second Birthday.  It proved to not only be a hit with my daughter, but has become one of my most viewed blog posts, so I thought I would share with you my plans for some more felty food toys I'm making my little one for Christmas.
 
I had this idea to make lots of bits and pieces for a kind of shop/market for my little girl.  So far I have been warming up by stitching some simple felt foods mainly from existing patterns which I've saved from old craft magazines.
 
 
Techniques so far have included sewing 3D cylinders, circles which are drawn in and stuffed (similar to making a Suffolk puffs,) and also tubes and cone shapes, both with drawn in ends.
 
 
OK so these strawberries aren't entirely felt, but they were so simple to make!
 
 
The carrots were made using the same kind of technique as the strawberries.
 
 
I particularly like this simplified version of a jammy dodger, from an old Mollie makes magazine.
 
 I do love sewing with felt, it's both easy and satisfying.  None of that stressing over fraying seams and lots of quick and easy whipstitching!  I've already made some felty sausages and bacon since taking these photos and have plenty more foodie makes planned, which I hope to share with you over the next few weeks.
 
Are you planning a handmade Christmas this year?


Thursday, 17 October 2013

Hot make for the cold months!

Hello!  I have been absent from my blog for a while now, lots of making going on, but a lack of blogging.  As the time passes, it's been harder and harder to get back into the swing of things! 
 
I thought I would come back with an easy sewing project ready for the cooler weather, that you could also make as a Christmas gift.  *Gasp!* It may be a little premature, but it is already on my mind, and if you are making gifts this year, you need to be planning ahead!
 
Before I show you my make, here's a little catch up...
 
 
During late summer/ early autumn I have: 
  1. Finished my double quilt. I'm not entirely happy with it, but it is such a load off my mind.    That is ALL of the FOUR jumbo unfinished blanket projects I started the year with, done and dusted (I must be mad!) 
  2. Sewn a mish mash patch work curtain for my back door, readying the house for the cold weather.
  3. Preserved what can only be described as THE bumper crop of plums.  Jam, chutney, pies, sauce and bags and bags of frozen plums to see us through the year.
  4. Been doing more jam making with blackberries and lots of lovely chutneys from the crops in our garden.
  5. Sewn a few smaller projects.
  6. Had my car in the garage three times, argh!
  7. Sorted wood, kindling, coal, chimney sweep in prep for fire lighting.
  8. Enjoyed a mini beak to Cromer in Norfolk and a mini break to Sheffield.
  9. Been drowning in free apples.
  10. Painted our bathroom (only two rooms to go whoop!)
  11. Crocheting a blanket for my little girl's bed.
There's probably more, but that's just off the top of my head.  Here's my little sewing project...


Winter Warmer How-To
Mini hot water bottle cover
 
This cute little hot water bottle cover was so simple to make! 
And best of all, if you're making it for yourself or as gift,
you can customise it as much as you like!
 
 
You will need:
 
A small hot water bottle
Cereal box for template
A pen to mark card and a fabric pen
Two large pieces of felt in hot pink and light pink
Sewing needle
Scissors
Pins
Sewing thread in hot pink and brown (to match felt and another to match your patch)
Embroidery thread in blue
Sew on/ iron on embroidered patch
 
How to:
 
1.  Draw around your hot water bottle onto the cardboard, leaving a 1.25cm border.  Leave a wider space around the neck of the hot water bottle, as in the photo below. 
 
 
2. Use the cardboard template you made to create two templates for the back of the hot water bottle cover.  (See photo below as a guide to where to place envelope opening.)  Remember to leave approx 1cm overlap for the two back pieces.
 
 
3.  Draw around templates onto both colours of felt and cut out pieces.
 
4.  Pin and sew together light and hot pink pieces using backstitch or running stitch and hot pink thread, leaving 0.25cm seam allowance around the pieces.
 
5. Sew on embroidered patch. I used brown cotton so the stitches were invisible.
 

6.  Draw on words with fabric pen.  I used couching embroidery for the lettering.  (Basically couching is attaching one thicker thread by using lots of little stitches and a smaller thread.)  I used three strands of blue embroidery thread and couched over it with the same hot pink thread I used to backstich the pattern pieces together. 
 
If you're not sure about couching, a simple back stitch or a split stitch would certainly do the job.
 
7.  Blanket stitch the two edges which will form the envelope opening.
 
8.  Pin all the pieces together, making sure that the right sides are facing out and blanket stitch around the whole cover.
 
 
9.  Fold back envelope opening and insert hot water bottle.


 Taah-Daah!
 
The colours really do sing sing.  The pink and blue make your eyes go a little crazy don't you think?


Tuesday, 28 May 2013

Soft sandwiches & felty fillings

I have been rather quiet this past week.  The reason for that is that my daughters second birthday is fast approaching.  As always I have bitten off more than I can chew with the making of presents (along with shopping, party food, my partners Birthday also this week, possibly two Birthday cakes, I feel quite stressed!)  When will I learn to start making sooner and not make things so complicated?! (probably never as I like to be busy and with me, the more complicated the better... no sympathy here then!)
 
This is the first of two toys I've been making her.  Some of her favourite toys are her plastic food things, so I wanted to add and expand on this play by making a soft sandwich.  I am hoping it will encourage more interactive play, talking about fillings, choosing different combinations, stacking the layers and probably a lot of bringing mummy different sandwiches.
 
 
I have seen some toys similar to this available that are made from wood, but when I saw the price I was like, HOW MUCH?!  Present buying gets so expensive and I refuse to spend loads on something I know full well I can make from bits and pieces in my stash.  While my kid is young and I can get away with it, I will!  I don't really see how such small hands are supposed to pick up a chunky wooden sandwich anyway, without it falling to pieces... leading to frustrated toddler tantrum! 
 
I really enjoyed working with the felt for a change (with the exception of the bread being cotton, the slice of ham was made from pink corduroy and the egg yolks a piece of nylon.)  It was nice easy sewing and the simple embroidery details were also fun to do.
 
 
The felt was limiting only in the fact that it is impossible to make sandwich fillings such as tuna and egg mayonnaise... I think however it is probably impossible to make these with anything other than actual tuna or egg!
 
 
I didn't use any patterns when making this project, as it was all fairly 2D, so everything was drawn out freehand.  This project was all hand sewn, with the exception of a quick whizz around the sewing machine on the cucumber and tomato, before hand stitching them... As I'm typing this, I realised I still have a little making to do as I've forgotten to make lettuce, DOH!
 
 
Chicken salad sandwich? ...Don't mind if I do!
 
 
A giant Scooby-Snack also looks quite good!
 
I am also working on a second present for my daughter this week, which is a doll with (hopefully) two or more dresses.  I have all the pattern pieces cut out so far, so fingers crossed I get it put together in time!  What have you been making?  I would love hear about your current projects.