Showing posts with label Crochet. Show all posts

Wednesday, 17 July 2013

Sunny Happy Summer Crochet

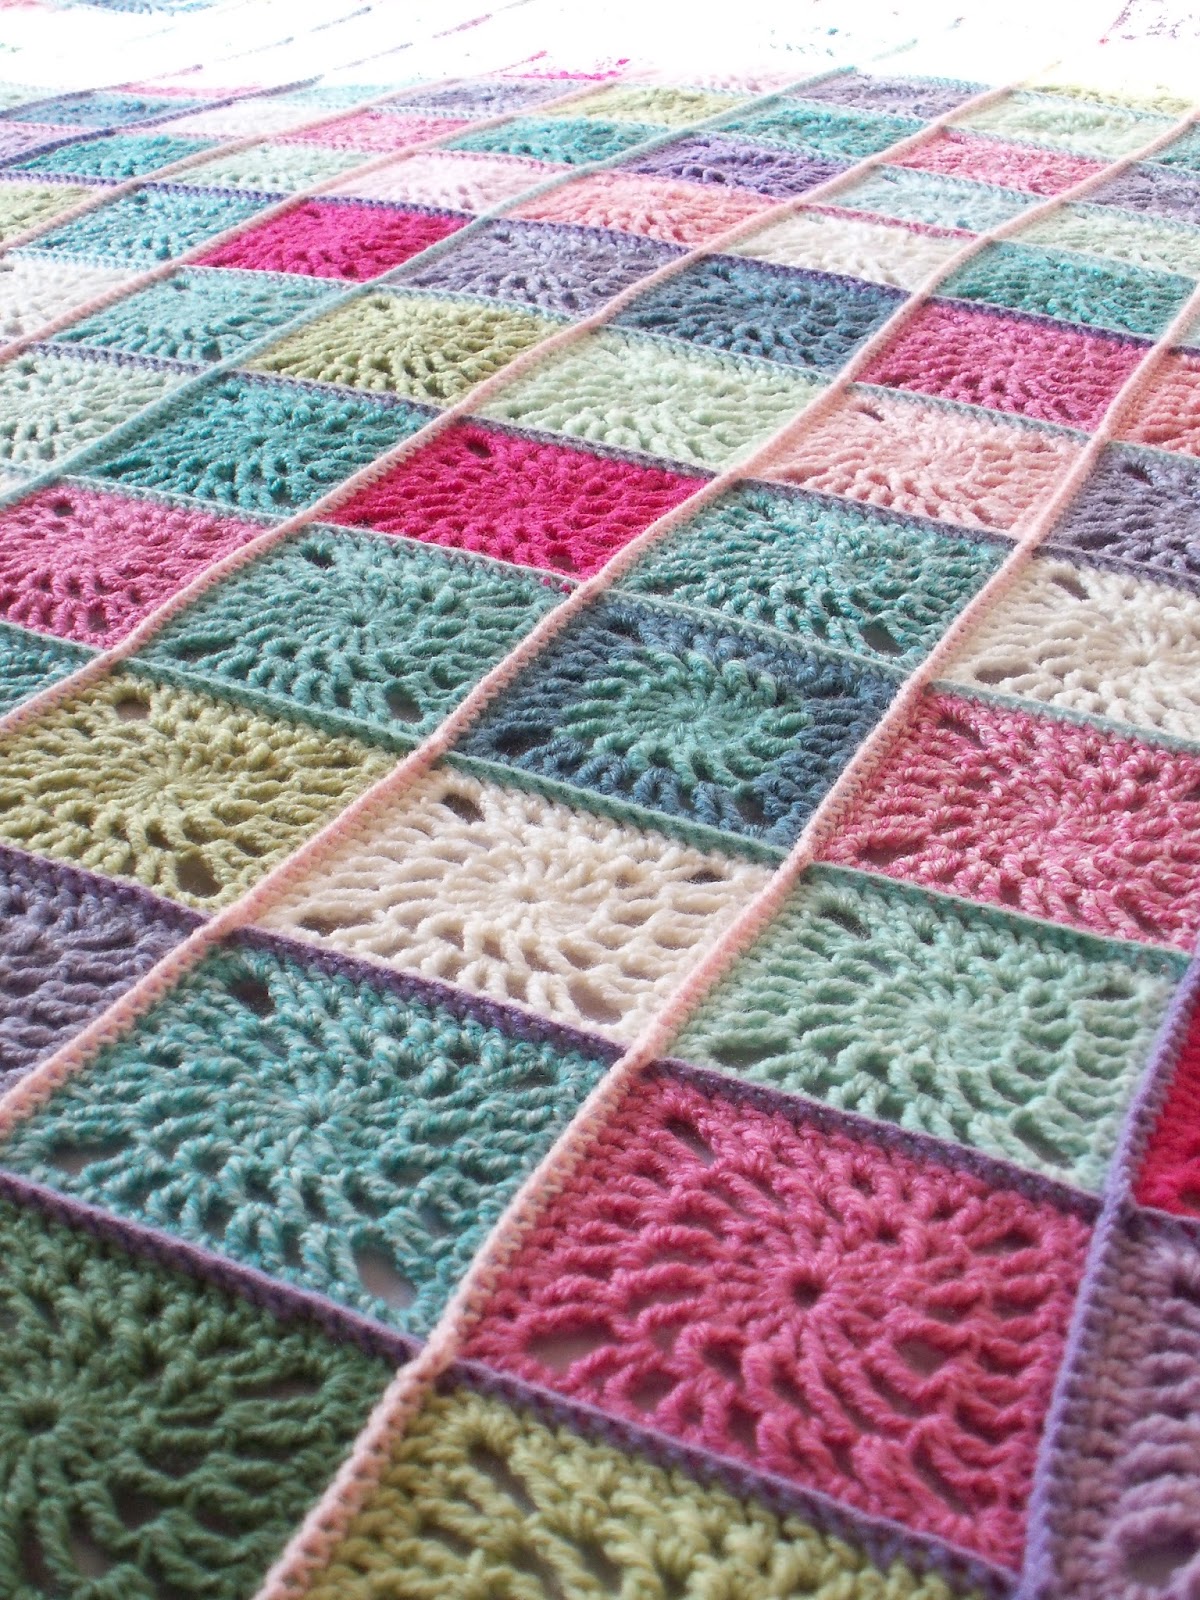
I was awake early this morning and the sun is streaming through my window.  I have been painting and redecorating my bedroom since the weekend, and as it is currently clutter free (it's all piled up in the spare room atm,) I thought I would take this opportunity to (finally) share with you my finished crochet bedspread.
 
She has not yet been washed or blocked, but here she is in all her colourful splendour...


I hope you are all enjoying the summer sunshine :o)


Wednesday, 5 June 2013

Light relief

...From that crochet itch
 
So I came to the end of my last crochet project... (which I know I have not yet shared on my blog as I've not gotten around to tidying said space, and such a large project requires quite a large proportion of tidiness in said room.  I have been feeling rather poorly for the past couple of weeks (nothing serious, just one cold rolling into the next, into the next...) and as I type, my little one (also poorly) has fallen asleep next to me in the double bed.  I am not personally one for napping in the day, but I am now mighty glad I got that blanket finished as I have been snuggling under it a lot this past week.  I will share pictures soon, I just kinda haven't gotten around to it.)
 
So anyway, I came to the end of my last crochet project and was like, "So what do I do now, huh?!"  I have this amazing idea tumbling over in my head for an awesome new "dream" blanket, but it still requires some thought on colour combinations and vitally, the purchase of new yarns.  So while that idea is developing I needed a crochet project to provide light relief from my crochet addiction.  Two whole days of no crochet was like cold turkey for me, I watched far too many episodes of CSI (with both eyes for a change) and my hook hand kept wanting to twitch.
 
I knew I had six balls of Sirdar Calico in my stash, in a kind of  "mucky" pale orange (shade: 714 for anyone who just needs this yarn in their life.)  The Calico is very soft to the touch and has a lovely light feel to it, a nice light weight yarn which is 60% cotton 40% acrylic, so great for a light summer throw.  Also great to crochet with this time of year without making you sweat profusely.
 
So I just set to work with my orange yarn and the other colours (also from my stash) got chucked in along the way.  The only bits of deep thinking that went on were "I want to make this different to anything I have done so far" and, "I don't want this to look like a carrot."
 
The other yarns are: Cream; Sirdar Snuggly baby bamboo DK (80% bamboo, 20% wool,) Blue; Rico Essentials cotton DK (100% cotton,) and Green; Emu Cotton DK (100% cotton.)
 
I didn't want to granny square it, as I've been granny squaring it to death for what feels like the past zillion months, so I went for stripes.  I also didn't want to go to big, as I have gotten a little fed up with huge projects looming over me like a big grey cloud.  
 
I started late on Saturday evening (please don't turn out like a carrot, please don't turn out like a carrot,) and this is how its coming along so far:
 
 
I am just using basic stitches of double crochet, chain stitch and slip stitch.  The stitches just fall into a repeating pattern, which alternates every two rows to create little windows or butterflies.  This is a good project for a beginner or an intermediate, wanting to try something new.
 
 
Fairly simple design, but creates a lovely patterned fabric.  I may have to do this in a solid colour somewhere down the line, as I think the pattern is even more prominent where its just done in orange. 
 
Easy-pearly-peasy stitches, but taxing enough to require a little concentration for pattern placement (I've had to pull back a few rows when getting cocky and not paying attention!)  Satisfying enough, to feel like I'm learning something completely new. 
 
I think I will never stop being amazed by the range of stuff you can do with crochet!
 

Friday, 3 May 2013

Crochet Lucky Dip!

I have been working away like a maniac, the last few days to share this with you:
 
 
That's right, after many weeks of crochet... well, some weeks more than others...  Some weeks a whole lot more and some weeks, really not a lot!  Anyway, i have FINALLY completed my last square.  That is 378 squares in total!  <Insert fan fair here>
 
 
I have coveted this blanket design for so long.  Since issue three of Mollie Makes magazine in fact, where I first drooled at this bedspread, in designer-maker Lisa Stickley's Clapham flat (www.lisastickleylondon.com)  And Mollie Makes I do believe is almost two, so that is quite some time!


So when I happened upon a similar looking design in an old magazine from the 70's, I was delighted and set to work...
 
 
While I was crocheting away, I added a handful of mixed coloured squares simply because I was getting bored:
 

Being careful to make sure than none looked like a nipple...  After reading of the horror story of one crocheter whom I follow on Facebook, who spent an afternoon crocheting two lovely circular cushions for her sofa, to be ridiculed by her teenage children because they looked like boobies.  Never crochet anything circular or sausage shaped in pink or flesh colour!
 
 
I spent any free time over the last couple of days sewing in all the ends of about the last 150 squares.  All I can say is, I'm so glad I didn't leave the sewing in of all the squares til the end or I may have actually gone mad!
 
 
Oh crochet how I love you so, and how I hate you also in the same breath....
Look at me, I'm a crochet machine....
Don't look at me, I want to shut you away in a cupboard and not continue....
You make me want to do a happy dance...
Oh crochet how you drive me to insanity at times...
Yet when you are complete, you will look so shweet upon my bed....
Oh crochet I will not let you get the better of me!
 
(See what this project has done to me!)

So now I have come to that part of granny square blanket making, where the whole thing needs to be joined together.  This is the main reason I have moved the square making up a gear.  The weather is starting to get warmer now, and I'm really not sure it is possible to sit with a woollen blanket on your lap piecing the whole thing together, whilst sweating like a pig, no matter how much you want to complete it!
 
 
In an effort to keep my sanity I am breaking trend with all my OCD ways and will not be laying out and planning out my design before I start the assemblage.  I have stuck all the squares in a huge laundry bag and will be using the lucky dip method.  Oh my word, this is not like me at all!  I wanted to try a different way of working, because over thinking it can often be quite hard work and ends up a bit of a headache.  It is really quite liberating to be working in this way!  And of course, if I did pull out, say four of the same colour in a row, I could have a sneaky reshuffle and re pick!
 
Are you working on any crochet projects at the moment?  I would love to hear what you are making!
 

Friday, 29 March 2013

User Upper Of Wooly Bits - Crochet Scarf Tutorial


This little project was originally inspired by A SCARF OF MANY SCRAPS, over on Tales of Ted and Agnes blog.  I read this blog post nodding my head and thinking, yurp I do have far too many odds and ends of wool laying around.  In fact I have a whole drawer full of bits and pieces that could do with using up.  What doesn't help is the fact that the first crochet project I ever undertook was a small afghan which used lots of different colours in small amounts.

(in hindsight this would have been a good project to use some of these little bits up... but you can't tell that to a woman on a crochet mission!)
 
With each each project I finish since then, I seem to just be adding more and more to my odds and ends drawer!
 
I've tried to add my own spin on this project.   I wanted to learn a new crochet stitch, so have made it almost lace looking.  Being a bit of a colour freak, I couldn't resist making this in brights.  My two coats that I've made this to go with are purple and electric blue, so, well, that says it all really!  Also part way through crocheting this scarf I decided to incorporate some embroidery into this project too... I mean, why not? I do have a habit of over complicating things I make.  Sometimes it can be a bit of a ball ache, but usually I'm happy with the results!
 
 
The stitch I've used is Basic Filet Crochet.  It looks complicated and fiddly, but if you look really closely it is made up of lots of chain stitches and double crochet, which are just placed in a repeating pattern.  So in reality it is actually really simple!
 
The pattern is worked in multiples of 12, plus 1.  I have done the scarf 4 x this in width, as I don't like a scarf that is too thin.  Seemingly a little pointless when you have the cold wind whipping around your neck!
 
 
The pattern goes as follows:
 
1. Ch12, plus 1, turn work.
 
2. Ch3 (to count as first dc), dc in 4th ch from hook, *3 dc, ch 2 (skip 2 stitches), dc in next ch, ch 2 (skip 2 stitches), dc in next ch, ch 2 (skip 2 stitches), dc. Repeat from * til end of row, turn work.
 
3. Ch 5 (skip 2 ch space), dc into top of dc, 2 dc into ch space, dc into top of dc, *ch 2 (skip ch space), dc into the top of dc, ch 2 (skip 2 dc), dc into top of dc, ch 2 (skip ch space), dc into top of dc, 2 dc into chain space, dc into top of dc, repeat from * to last 2 squares, ch 2 (skip ch space), dc into top of dc, ch 2 (skip 2 dc), dc into top of dc, turn work.
 
4. Ch 3, dc into top of dc, *2 dc into ch space, dc into top of dc, ch 2 (skip ch space), dc into top of dc, ch 2 (skip 2 dc), dc into top of dc, ch 2, (skip ch space), dc into top of dc, repeat from *, ending with a dc in 3rd ch of ch space at end of row, turn work.
 
5. Continue steps 3, 4, 3, 4...
 
6. When I got towards the end of the scarf, I decided I wanted to add embroidery detail.  To do this I simply filled in the little "windows" (ch spaces) in three places, to leave space for three patches to be sewn on.  This is mainly so that the scarf appears neat on the reverse side and also to keep the embroidery laying fairly flat.
 

The scarf I made is 188 rows in length.  Long enough to double over and fold back through itself.  The block patches I have added are on rows 165, 168 and 178.  You could also make this scarf narrower and shorter for a much quicker project.
 
 
As we are coming to the end of winter, (hey its nearly summer and still snowing here!) I wanted to give the scarf a little longevity of wearing, so gave it a spring time vibe.  I've added embroidery of two blue birds with a heart, a sunshine peaking through clouds and the words "one fine day." I created the patches using two layers of cotton fabric.  The designs were drawn on in water soluble pen and embroidered using only satin stitch and basic back stitch.  I then ladder stitched the patches into place, tidied up all my loose ends, washed away the water soluble pen and voila!
 
 
I wore her into town today and she was lovely and warm!


Wednesday, 13 February 2013

Some thrify finds

  
At the weekend I went to the visiting antiques fair at the Royal Norfolk Show Ground.  They are few and far between in this area, so I was quite excited to have a bit of a rummage around!  I stumbled upon a shoe box of twisted up cottons and picked out a few threads and a roll of white bias tape.  I probably would have picked up some more cottons while I was there, but everything was so tangled in the box and it was so cold I had lost the feeling in my hands and feet!
  
 
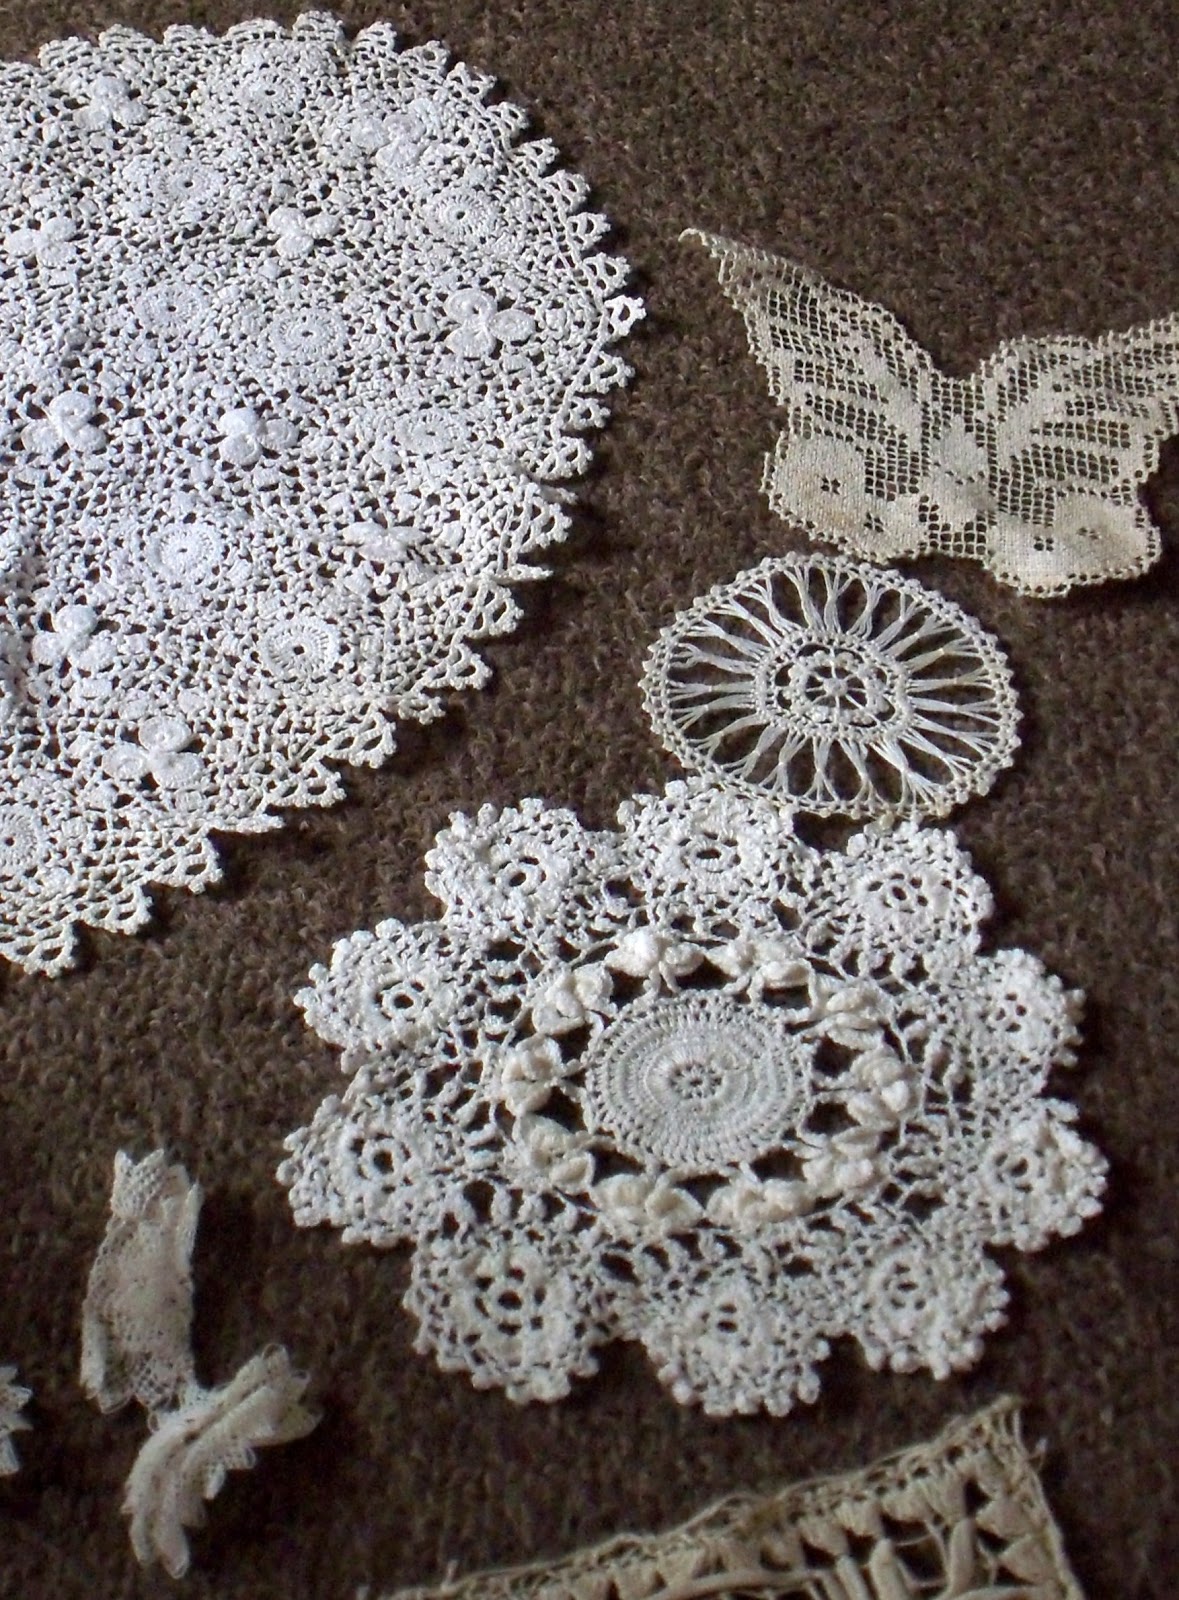
I also found another stall which had suitcases bursting open with antique lace clothes, handkerchiefs and fabric items.  I picked up lots of doilies, three rolls of lace trims and lots of other lovely bits and pieces.
  
 
 I think some of the pieces of lace are handmade and really quite old.  They must have taken a long time to make originally and a heck of a lot of patience!
 
 
 These ones are extra delicate!


This one was a little bit different.  Its an oval in sheer material with little flowers on, edged in lace.  I expect its more modern than a lot of the other ones, but it stood out to me. I thought it was quite twee and imagined it was originally sat on a dressing table, as its a bit bedroom looking.
 
Once I had been round the fair, I doubled back on myself and went back to the stalls outside for a second look.  I felt that a lot of the indoor stalls were a little over priced for my liking, no matter how warm it was!  I was on a bargain hunt, not specifically looking for pricey antiques.  I found a large crochet blanket in brights and pastel squares, with a zig-zag edging.  But after giving the blanket a bit of a sniff, I put it back as it smelled a little too funky for my liking.  It was also sat on an old pram with visible mildew marks.  I do like thrifty finds, but I definitely do not like wifty finds!  There is also nothing worse than washing and rewashing second hand things, to find that you just can't shift the smell.
 
I headed back to the stall with the antique clothes and fabrics for another look around.  I found this huge crochet blanket in white cotton.  Its a large double bed throw and is edged with a zig-zag pattern.  After lots of umming and ahhing with the stall holder I bought what I consider to be a bit of a bargain, given how many zillions of hours it must have taken!
  
 
It is a little bit thread bare in places and will take a lot of TLC to fix up, but I think its lovely.  It reminds me of a huge papercut, and looks so beautiful held up to the light.
  
 
This is some of the damage on the blanket.  I am hoping I can restore it sympathetically with some plain cotton thread.  I can see places where someone has tried to fix it before with the wrong nylon thread and it sticks out like a sore thumb to me.  Hopefully I can do a better job, and if not I might be able patch it with something new.  Maybe I could cover the damage with material backing and some crochet flowers... hmmm.


Wonderful crochet windows :o)
 

Tuesday, 12 February 2013

Crochet Marathon!


Very happy this morning as I finished piecing together my granny square afghan just before bed last night.  So am finally getting to enjoy the fruits of my labour!


And indulging in a little light cushion rearranging ;)
 
The finished blanket measures 112cm x 194cm, so is pretty large and is approximately 160+ hours work. I probably could have got away with it being a fair bit smaller, as half the blanket hangs down the back of the sofa and can't be seen.  I do however like a blanket to be practical as well as pretty.  And there is nothing worse than chucking a lovely handmade throw over yourself for a nice nap, to find you can feel a draft.  And no matter how much you wiggle and jiggle about, and manouvre the blanket over yourself, you just can't get comfy cos your bum is hanging out the side of it!
 
 
I am also feeling a little smug because there was very little wastage of yarn.  I normally make a project and  end up with lots of little odds and ends in all sorts of colours, and have no idea what to do with them!  But with this blanket, I used up all the leftover pieces of wool to join the squares together.  I even unpicked a couple of squares over towards the end, to finish of the very last parts, rather than start a new ball !
 
 
A lot of work, but wirth it all in the end.  I hope you enjoy my pictures!


Wednesday, 6 February 2013

Lets start at the beginning!

So this is it, I am stepping out into the wide world of blogging. I must admit I feel a little nervous at the thought of just anyone stumbling across my ramblings, but if I forever hide back in the burrow from which I came, this will never happen. So hey ho, be positive, here goes nothing!


Touche Crochet

I am currently working on a crochet granny square afghan in olive, mustard, purple, maroon, cream and peach. Yes, I know what you're thinking (what an odd combination), but I was given a lot of free yarns and actually it is coming out rather well.
 
 
I am at that tedious and fiddly stage of joining all the squares. But I am remembering to sew all the ends in as I go, so I don't have even more of a headache once I get to the end. Also, I thought it may do my hand some good to mix it up between single crochet and a little light sewing.


This is how I keep all my squares in order when assembling a blanket.  Once I've laid out my design on the dining room floor, I stack up all my rows and keep my squares from getting muddled again by using nappy sacks and numbered post-it notes (very glamorous!) I then make sure they are kept safe and away from mischievous little hands. I like to use my wicker picnic basket for storage as it has a buckle fastening that my daughter hasn't worked out how to undo yet!
 
I've got another three rows to attach to the blanket (vertical stripes) and then work all the long horizontal rows. Not decided yet whether to crochet around the outside. Think I will wait and see how it looks once I'm finished.


This is the sofa the blanket is destined for. Think it will tie in well with all my cushions.